Use Sequel Pro database management, with SSH, Serverpilot, and Digitalocean
First things first, we just want to say that we absolutely love Digitalocean and Serverpilot services. It makes setting up new servers a snap.
The problem we ran into a while back is that Sequel Pro couldn’t connect to our database, and we really wanted to use Sequel Pro database management tool, with SSH, Serverpilot, and Digitalocean.
After you launch your new droplet at Digitalocean you head on over to Serverpilot and connect your server to their service, create an app, and install wordpress. In at around 5 minutes you can have a dedicated cloud server using NGINX in the front, Apache doing all the lifting, and MySql for a database. Pretty sweet we say, not to mention, not needing to know 1 single ssh command.
Setting up Sequel Pro database management console
Now for what you have come here for, to know how to use Sequel Pro database management with Serverpilot and Digitalocean. We looked around on Google to see if there was some other tutorials on how to set this up, but the ones we ran into wanted to use some hacks with command line stuff, there had to be an easier way. Actually now that we done it, it wasn’t really all that difficult to do.
Setting up to work
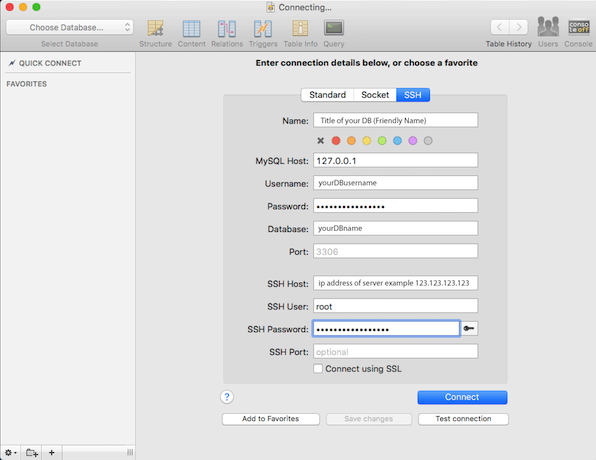
First up, go grab Sequel Pro, if you haven’t, already, set up your new server using the docs from Digitalocean and Serverpilot. Next open up your Sequel Pro program. Open a new connection widow or tab. Select the far right tab labeled “SSH”. Under that tab you will see where your server credentials will need to go.
Let’s start from the top and work our way down. The “Name” is just a general name or “Friendly Name” so when you save the connection, or have multiple databases listed you can easily determine the correct one. The next input is “MySQL Host:” this is best left at 127.0.0.1 which is also “localhost”. This setting is common in most servers. Next is “Username:”, and “Password:” this is where you will put your database Username and Password at. To find this log into your Serverpilot account, click on the server name under the main section of the page. You would have set this up before connecting your server to Serverpilot. Then click on your app name, then at the top of the final page you will see a menu with “Databases” within. Click “Databases” and it will provide you with the name of your database (left) and username (right). If you did not manually setup the database and used the wordpress installation from Serverpilot, you can simply skip the few steps above and look at your wp-config.php file for the credentials needed.
define('DB_NAME', '');
define('DB_USER', '');
define('DB_PASSWORD', '');
The next important thing to note is the ip address of your new server we will use 123.123.123.123 as an example. This will need to be place in the “SSH HOST” input. Next you will need to input your “SSH USER”, and “SSH Password”, you could however use your rsa key by clicking on the key to the right by the Password input box.
Finally, you should have all the inputs filled out, and now it’s time to “Test connection”. If all was inputed correctly you should get a successful connection message. If this is a database you will be working with frequently we suggest that you save the connection via the menu > File > Save Connection, as well as adding it to your “Favorites” sidebar.
Your end result should look like the image below

Thanks for the tip about Local host IP address, helped me out 🙂