Custom Message (admin notice) on your Advanced Custom Fields Options Page
We here at Matrix Web Designers love using Advanced Custom Fields (ACF).
With that said, we will show you how to make a nice Admin Notice that will display at the top of your options page. For a bonus, we will show you how to only show it on a specific options page, and another bonus is to only show it for specific users.
First up, make sure you have ACF Pro installed so we have access to the options pages. You can do it with the free version but we recommend supporting the author’s work. ACF is hands down the easiest way to make setting pages.
Let’s get coding, shall we?
So if you are new to ACF and the Options Page please read their documentation first to get a full understanding of what is going on here.
First, we will create a file to handle all of our ACF goodness. You can place this in a child theme or a simple plugin.
For simplicity, we will call this file acf.php
<?php
/*
 * This file lists all files needed to include the Advanced Custom Fields Pro plugin aka ACF
 *
 */
// If you include the ACF PRO plugin with your theme
define( 'MY_ACF_PATH', get_theme_file_path() . '/thirdParty/acf/' );
define( 'MY_ACF_URL', get_stylesheet_directory_uri() . '/thirdParty/acf/' );

// Lets see if there is a currently installed version of ACF
if( class_exists('ACF')) {

	// If its already installed we dont need to include our version..

}else{
	// Include the ACF plugin.
	include_once( MY_ACF_PATH . 'acf.php' );
}

// We still need to make sure that the ACF class exists just to be certain ACF is loaded..
// Let's check that now
if( class_exists('ACF') ) {

	// Our Future code

}// Ends class_exists('ACF')
As you can see there’s a lot going on here.
Let’s break it down a bit.
First, we define MY_ACF_PATH and MY_ACF_URL, this is where you will include the plugin files if you are shipping it with your plugin/theme. So in this case ours is inside of /wp-content/themes/mytheme/thirdParty/acf/.
Next we check to see if ACF is installed and active, if it is we dont need to include our version.
Note: the downfall to bundling ACF Pro with your plugin/theme is you always will have to release updates each time ACF is updated. Another option is to require the plugin to be installed and activated by the site owner before installing your plugin/theme.
Now let’s add our options page(s) and our new Admin Notice. Begin by going back to // Our Future code.
Replace that with the following.
// Custom Options Page
function jematrix_options_init() {
if( function_exists('acf_add_options_page') ) {
// Add parent.
acf_add_options_page(array(
'page_title' => 'Site Settings',
'menu_title' => 'Site Settings',
'menu_slug' => 'site-settings',
'capability' => 'edit_posts',
'position' => '1',
'icon_url' => 'dashicons-admin-generic',
'redirect' => true,
));
$current_user = wp_get_current_user();
$userID = $current_user->ID;
//$userID = wp_get_current_user_id();
if ( $userID == '1' || $userID == '2' ) {
add_action( 'admin_notices', 'jematrix_settings_welcome_notice' );
acf_add_options_sub_page(array(
'page_title' => '',
'menu_title' => 'Overview',
'parent_slug' => 'site-settings',
'menu_slug' => 'site-overview',
));
}else{
add_action( 'admin_notices', 'jematrix_settings_error_notice' );
}
} // End if( function_exists('acf_add_options_page')
} // End function jematrix_options_init()
add_action('acf/init', 'jematrix_options_init', 99);
//Display admin notices
function jematrix_settings_welcome_notice() {
//get the current screen
$screen = get_current_screen();
$current_user = wp_get_current_user();
$usersname = $current_user->user_firstname;
//return if not plugin settings page
//To get the exact your screen ID just do var_dump($screen)
if ( $screen->id !== 'toplevel_page_jematrix-settings') return;
?>
<div class="notice notice-success is-dismissible">
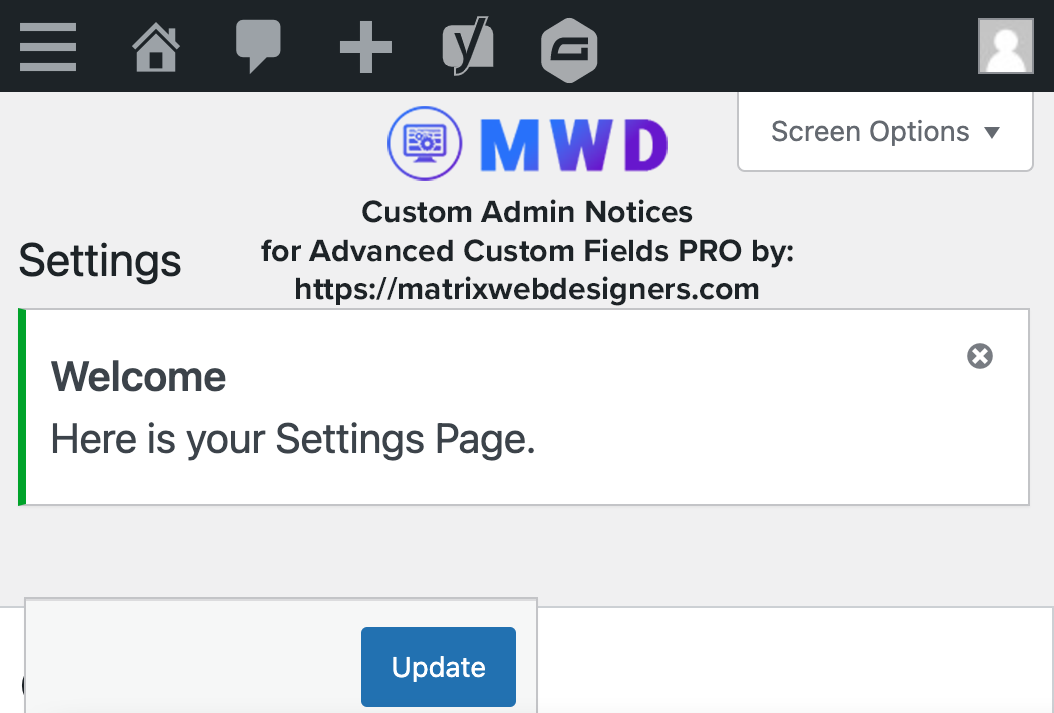
<p style="font-size:1.3rem;"><?php _e("<b>Welcome $usersname </b><br>Here is your Settings Page.", "textdomain") ?></p>
</div>
<?php
}
//add_action( 'admin_notices', 'jematrix_settings_welcome_notice' );
//Display admin notices
function jematrix_settings_error_notice() {
//get the current screen
$screen = get_current_screen();
//return if not plugin settings page
//To get the exact your screen ID just do var_dump($screen)
if ( $screen->id !== 'toplevel_page_site-settings') return;
?>
<div class="notice notice-error">
<p><?php _e('Sorry you are unauthorized to view this page. Please contact the site owner.', 'textdomain') ?></p>
</div>
<?php
}
//add_action( 'admin_notices', 'jematrix_settings_error_notice' );
Wow, that’s a lot of code to digest.
Here’s a short and dirty breakdown.
First, we get the current user’s ID so that we know which message to display. then we add that sub-page for that user’s ID.
Finally, one of two functions will be called, based on if it’s the correct user ID or not. Also, inside these functions, we double-check to ensure that it’s the right page, and then we display our message.
This should be considered a starting point and not a final result.
However, if you followed the steps above the end results should look like the image below:
Happy Coding