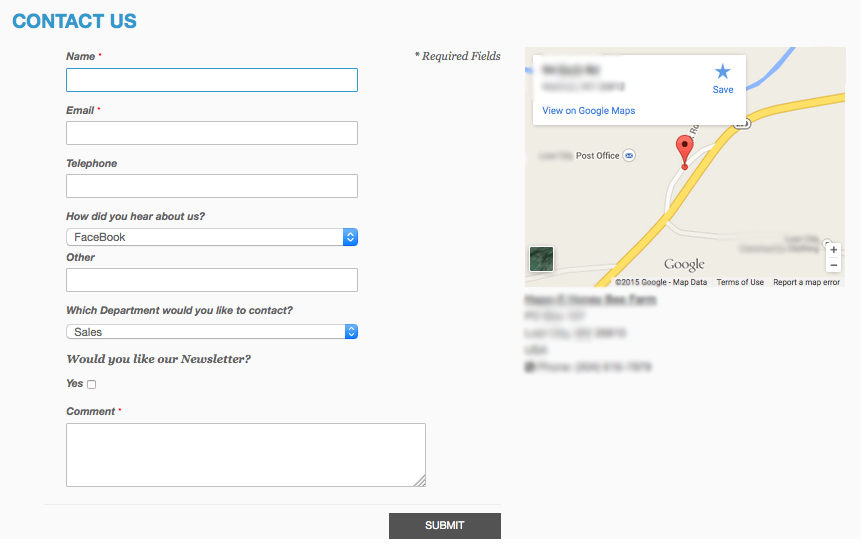
In this how-to tutorial we will show you how to make a stunning custom Magento contact form using the default contact form. A live demo can be found Here
First you will need to make sure you have the form.phtml in your theme’s folder the structure is /app->design->frontend->yourtheme->default->template->contacts->form.phtml if your theme doesn’t have this please duplicate it from the base theme.
<div id="messages_product_view"><?php echo $this->getMessagesBlock()->getGroupedHtml() ?></div>


<div class="page-title">


<h1><?php echo Mage::helper('contacts')->__('Contact Us') ?></h1>


</div>


<div class="center-main">


<form action="<?php echo $this->getFormAction(); ?>" id="contactForm" method="post" class="scaffold-form contact-page">


<div class="fieldset">


<h2 class="legend"><?php echo Mage::helper('contacts')->__('Contact Information') ?></h2>


<?php echo Mage::helper('contacts')->__('* Required Fields') ?>


<ul class="form-list">


<li class="fields">


<div class="field">
                    <label for="name" class="required"><em>*</em><?php echo Mage::helper('contacts')->__('Name') ?></label>


<div class="input-box">
                        <input name="name" id="name" title="<?php echo Mage::helper('contacts')->__('Name') ?>" value="<?php echo $this->escapeHtml($this->helper('contacts')->getUserName()) ?>" class="input-text required-entry" type="text" />
                    </div>


                </div>


<div class="field">
                    <label for="email" class="required"><em>*</em><?php echo Mage::helper('contacts')->__('Email') ?></label>


<div class="input-box">
                        <input name="email" id="email" title="<?php echo Mage::helper('contacts')->__('Email') ?>" value="<?php echo $this->escapeHtml($this->helper('contacts')->getUserEmail()) ?>" class="input-text required-entry validate-email" type="email" autocapitalize="off" autocorrect="off" spellcheck="false" />
                    </div>


                </div>


            </li>


<li>
                <label for="telephone"><?php echo Mage::helper('contacts')->__('Telephone') ?></label>


<div class="input-box">
                    <input name="telephone" id="telephone" title="<?php echo Mage::helper('contacts')->__('Telephone') ?>" value="" class="input-text" type="tel" />
                </div>


            </li>


<li>
            	<label for="hear"><?php echo Mage::helper('contacts')->__('How did you hear about us?') ?></label>


<div class="select">
            		<select name="dropdown" id="dropdown">
<option name="facebook" value="FaceBook">FaceBook</option>
<option name="google" value="Google">Google</option>
<option name="bing" value="Bing">Bing</option>
<option name="other" value="Other">Other ( Please tell us below )</option>
            		</select>
            	</div>


            	<label for="other"><?php echo Mage::helper('contacts')->__('Other') ?></label>


<div class="input-box">
                    <input name="other" id="other" title="<?php echo Mage::helper('contacts')->__('Other') ?>" value="" class="input-text" type="text" />
                </div>


            </li>


<li>
            	<label for="dept"><?php echo Mage::helper('contacts')->__('Which Department would you like to contact?') ?></label>


<div class="select">
            		<select name="dropdown2" id="dropdown2">
<option name="sales" value="Sales">Sales</option>
<option name="customerservice" value="Customer Service">Customer Service</option>
<option name="webmaster" value="Web Master">Web Master</option>
            		</select>
            	</div>


            </li>


<li>


<b><?php echo Mage::helper('contacts')->__('Would you like our Newsletter?') ?></b>


<div class="checkbox">
	            	<label for="type"><?php echo $this->__('Yes') ?></label>
					<input type="checkbox" name="type" id="type" value="Yes" />
            	</div>


            </li>


<li class="wide">
                <label for="comment" class="required"><em>*</em><?php echo Mage::helper('contacts')->__('Comment') ?></label>


<div class="input-box">
                    <textarea name="comment" id="comment" title="<?php echo Mage::helper('contacts')->__('Comment') ?>" class="required-entry input-text" cols="5" rows="3"></textarea>
                </div>


            </li>


        </ul>


    </div>


<div class="buttons-set">
        <input type="text" name="hideit" id="hideit" value="" style="display:none !important;" />
        <button type="submit" title="<?php echo Mage::helper('contacts')->__('Submit') ?>" class="button"><span><span><?php echo Mage::helper('contacts')->__('Submit') ?></span></span></button>
    </div>


</form>


</div>


<script type="text/javascript">
//<![CDATA[ var contactForm = new VarienForm('contactForm', true); //]]>
</script>


<div class="right-main">


<div>
		<iframe class="mapFrame" frameborder="0" style="border:0" src="Add your map link here"></iframe>
	</div>


<div>


<address class="vcard">
			<span class="fn"><b><u>Your Company/u></b></span>
			<span class="adr">
				<span class="street-address">123 My Stree</span>
				<span class="locality">My City</span>,
				<abbr class="region" title="Texas">TX</abbr>
				<span class="postal-code">Your 5 digit zip code</span>
				<span class="country-name">USA</span>
				<span class="tel"><i class="fa fa-phone-square"></i> Phone: (123) 123-1234</span>
			</span>
		</address>


	</div>


</div>
This sets up the structure, and elements of our contact form. Please change the google maps src location to your own, and update the vcard information.
Next we will add our new user input values to the email being sent to us. This file can be found at /app->locale->en_US->template->email->contact_form.html
Name: {{var data.name}}

Email: {{var data.email}}

Telephone: {{var data.telephone}}

How did you hear about us? {{var data.dropdown}}
How did you hear (Other): {{var data.other}}

Which Department would you like to contact? {{var data.dropdown2}}

Newsletter Signup: {{var data.type}}

Comment: {{var data.comment}}
Next we will add our styles to our stylesheet we used the RWD theme so you will see our responsive css. We also used a class for our google map iframe so we could change its size for each viewport.
@media only screen and (min-width: 776px) {
	.center-main{width: 50%;float: left;}
	.right-main{max-width: 50%;float: left;margin-left: 30px;}
}
.mapFrame{width: 400px;height:300px}
@media only screen and (max-width: 1220px) {
	.mapFrame{width: 350px;}
}
@media only screen and (max-width: 1087px) {
	.mapFrame{width: 300px;}
}
@media only screen and (max-width: 954px){
	.mapFrame{width: 200px;}
}
@media only screen and (max-width: 775px) {
	.mapFrame{width: 500px;height:300px;margin-top: 30px}
}
@media only screen and (max-width: 550px) {
	.mapFrame{width: 270px;height:200px}
}
.captcha-img {
    height: 100px;
    max-width: 320px;
}
If you do use the RWD theme it by default removes the Captcha image from the page. So you will always get an error saying you didn’t enter the Captcha right as it doesn’t show on the page, if you have it enabled in the admin.
To fix this just rename the file captcha.xml to captchaOLD.xml located at /app->design->frontend->yourtheme->default->layout->contact.xml
Let us know your thoughts below in the comments section.