Adding a version number to WooCommerce Downloads Table using custom fields
Recently we where challenged to find how to add a version number to WooCommerce Downloads table from with the my account section. After a quick search through Google, which yielded no favorable results we ended up creating our own solution.
Not only did we need the version column in the downloads page of my account, but also a custom table within the sites theme. This table loops through all WooCommerce products (our store only contained downloadable products), but we will show you how to select specific categories as well.
The two screenshots below will show the end results of our work.
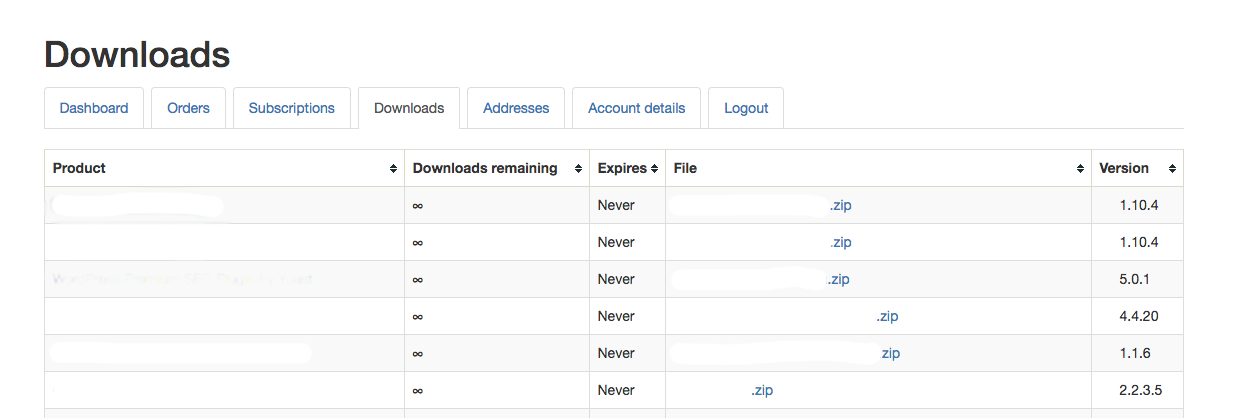

Lets start with the WooCommerce Downloads table under My Account
First, we will have to make a custom function in our functions.php file in our theme, or another file for functions as long as it’s being called on.
function add_woocommerce_account_downloads_columns( $actions ) {

    $actions = array(
        'download-product'   => __( 'Product', 'woocommerce' ),
		'download-remaining' => __( 'Downloads remaining', 'woocommerce' ),
		'download-expires'   => __( 'Expires', 'woocommerce' ),
		'download-file'      => __( 'File', 'woocommerce' ),
		'download-actions'   => ' ',
        'download-product_version'   => __( 'Version', 'woocommerce' ),
    );

    return $actions;
}
add_filter( 'woocommerce_account_downloads_columns', 'add_woocommerce_account_downloads_columns', 10, 2 );
Basically what this code is doing is overriding the default WooCommerce code and adding in a new column to our table “Version”.
Next we need to add the new <td> column to the table within the template file. If you do not know how to override WooCommerce templates, do a quick search on it. They’re lots of tutorials out there on how to do so.
Lets open up /themeName/woocommerce/myaccount/downloads.php
At the end of the switch > case statements add the following code:
											<?php break;
										case 'download-product_version' :

												$dl_id = $download['product_id'];
												$version = esc_html( get_post_meta( $dl_id, 'version', true ) ); ?>

												<span class="version"><?php echo $version; ?></span>

										<?php break;
									}
								}
							?>
						</td>
The bottom of your switch statement should look like this if you haven’t made any other changes too that file.
Line by line:
1: If its “download-product-version” column
2: Set variable $dl_id to WooCommerce product by ID
3: Set variable $version to the WooCommerce product by ID and get the Custom Meta “Version”
4: Echo the variable $version so we can display it.
Now for any of this to work correctly you must set your custom field on each product. First make sure you have the Custom Fields checkbox checked on top the page. Click on “Screen Options”

Then scroll down to where you see the Custom Fields area. Typically near the bottom of the page.
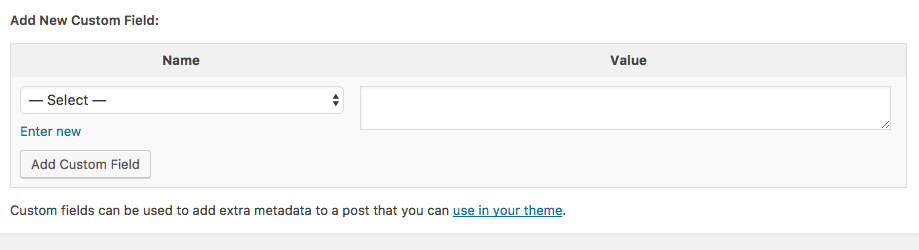
Click on “Enter New”. In the Name area type Version, and in the Value area type in your desired version number i.e. 1.1.10
Once that has been set you will now see your version number displaying on your downloads page under my account.
Adding a custom table looping through WooCommerce products, and setting version and updated date
This section will produce the results of the second image from the top. To start out lets open up any of your theme page template files i.e. front-page.php home.php, etc..
This is the whole block of code. We will explain it below.
<?php

// Setup your custom query
$args = array( 'post_type' => 'product');//Shows all products
//$args = array( 'post_type' => 'product', 'product_cat' => 'your-cat');//show only your cat plugins products
$loop = new WP_Query( $args );
global $product;

?>
<table class="shop_table shop_table_responsive tablesorter">

	<thead>
		<tr>
			<th class="col-md-6"><span class="nobr">Plugin / Theme Name</span></th>
			<th class="col-md-2"><span class="nobr">Current Version</span></th>
			<th class="col-md-2"><span class="nobr">Last Updated</span></th>
		</tr>
	</thead>

	<tbody>

<?php
while ( $loop->have_posts() ) : $loop->the_post(); ?>

		<tr>
			<td>
				<a class="productLink" href="<?php echo get_permalink( $loop->post->ID ) ?>">
					<?php the_title(); ?>
				</a>
				<?php //echo get_the_excerpt(); ?>
			</td>
			<td>
				<span class="version"><?php echo esc_html( get_post_meta(get_the_ID(), 'version', true) ); ?></span>
			</td>
			<td>
				<?php
					$u_time = get_the_time('U');
					$u_modified_time = get_the_modified_time('U');
					if ($u_modified_time >= $u_time + 86400):
						//echo '<span class="time">' . the_modified_time("F jS, Y") . '</span> '; ?>
						<span class="time"><?php echo the_modified_time('F jS, Y'); ?></span>
				<?php else: ?>
						<span class="time"><?php echo the_time('F jS, Y'); ?></span>
				<?php
					endif;
				?>
			</td>
		</tr>

<?php endwhile; wp_reset_query(); // Remember to reset ?>
	</tbody>
</table>
The first few lines just setup the wp query and loops through all the products. Line 5 is an example if you only wish to use one category for the loop. You can add multiple categories by separating it with a comma.
Next is just basic bootstrap table format. If you haven’t noticed we are using a jQuery plugin called table sorter. Completely awesome and super simple to use.
Next we setup the table row and our cells within the loop. The first td is our product name. Second td is our Custom Field Version number. The third and final td is the updated date. The updated date is based on the last time you clicked on update on the products page. If you wish to have something different you could follow the same steps above and add a new Custom Field for Updated time.
We hope you enjoyed this article. Let us know what you think below in the comments section.
View this on Github Matrix Web Designers Github – Adding Custom Fields Version Number to WooCommerce Downloads page